The Work Order contains several tabs for capturing data for the service
event. These tabs are: Service, Extended Data, Log Notes, Labor / Files,
Standards / Accreditations, Notes, Parts, Sub Contract / Estimate, Results.
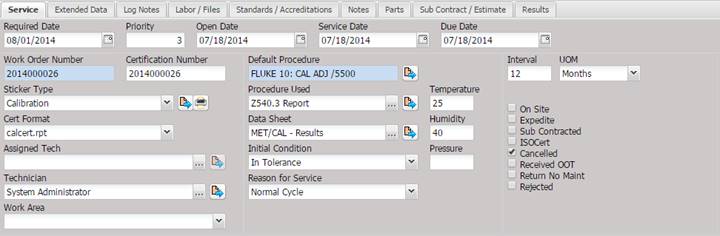
The Service tab displays all the information related to the service that was performed and the procedure used.
·
Required Date – Date the customer requests the Asset to be returned
by. This date is brought forward from the receiving process.
· Priority - The priority of the Asset in service.
· Open Date – Date the Work Order was opened in MET/TEAM. This date is controlled by the system and cannot be changed by the user.
· Service Date – Date the maintenance was completed. If empty, the current date is entered when the date control button is selected.
- The Service Date is always required except if the Cancelled, Return No Maint, or Rejected checkboxes are checked.
· Due Date – Date the Asset is next due for this type of service.
o If the Due Date is empty, this date is automatically filled in when tabbing out of the Service Date and into the Due Date or when a mouse click makes the cursor appear in the Due Date.
§ The Due Date is only required when the Service Type Recalled checkbox is selected. This checkbox is displayed on the Service Type screen which is accessed from the Setup menu Services submenu.
§ The Due Date is populated with today’s date if the WO Results contains ‘Fail’.
§ The Due Date is populated with a calculated Due Date (Service Date plus the interval) if the WO Results contains ‘Pass’.
- If the calculated Due Date falls on a Calendar Non Workday, the Due Date is adjusted backwards to the next workday. For example, if the calculated Due Date was 8/1/2014 and 8/1/2014 has been marked in the Calendar as a Non Workday, the Due Date is recalculated to 7/31/2014.
- The Due Date can be blank if the Cancelled, Return No Maint, or Rejected checkboxes are checked.
· Work Order Number – The system generated number for this Work Order. This number is unique throughout the data and is used to track all information about this Work Order.
· Certification Number – The certificate number for the calibration. If left blank, the Work Order number is used. To print a certificate of calibration, use the Cert button on the toolbar.
·
Sticker
Type – The type of sticker placed on the Asset after the service is
complete. To add notes for stickers such as “Special Cal” setup a Quick Note.
o The sticker can be viewed by selecting the Quick Link button.
o The sticker can be printed by selecting the Print button.
This field can be changed on multiple Work Orders when the Batch button is used. See the section Batch (Work Orders) for more information.
· Cert Format – Can contain the report file name for this calibration. This field must be set prior to closing the work order. Once the work order is closed this cannot be changed.
This field can be changed on multiple Work Orders when the Batch button is used. See the section Batch (Work Orders) for more information.
· Assigned Tech – The technician assigned to do the service.
This field can be changed on multiple
Work Orders when the Batch button is used. See the section Batch (Work Orders)
for more information.
· Technician –The technician of record for this service event.
This field can be changed on multiple
Work Orders when the Batch button is used. See the section Batch (Work Orders)
for more information.
·
Work Area
– The area of the lab where the service is being performed. Brought forward
from the receiving process. This field can be changed on multiple Work Orders
when the Batch button is used. See the section Batch (Work Orders) for more
information.
· Default Procedure – The name the procedure recommended for this type of service. The default procedure is pre-filled from the procedure associated with the Asset type.
o The default procedure can be viewed by selecting the Quick Link button.
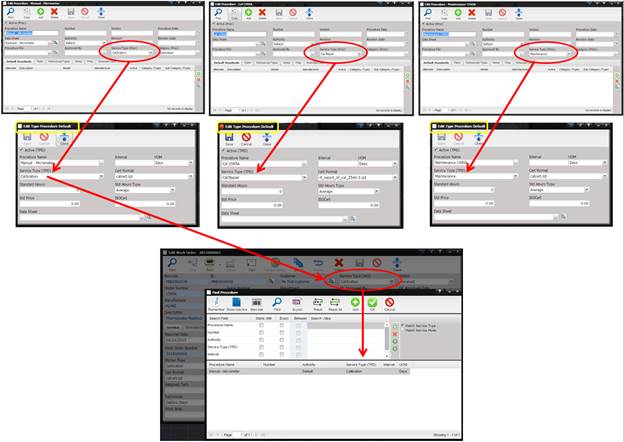
· Procedure Used - The name of the procedure the technician used for this Work Order. If the calibration was performed by MET/CAL® this is automatically populated.
o The procedure can be changed by selecting the “…” button. The Find Procedure screen is displayed.
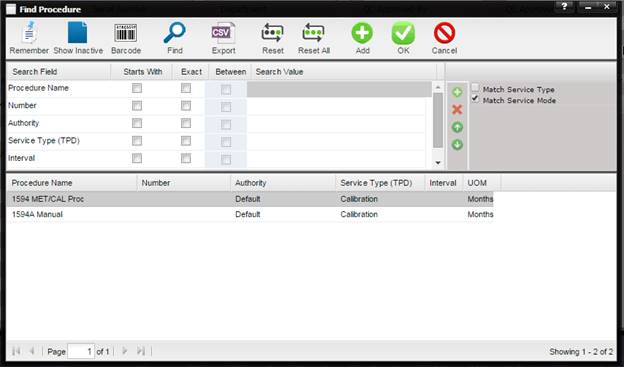
There are two check boxes on the right hand side of the search grid.
·
Match Service Mode –
(default) – When checked, the find procedure results are filtered so that only
procedures that have a Service Type (Proc) value’s Service Mode matching the
Work Orders Service Type (WO) value’s Service Mode. 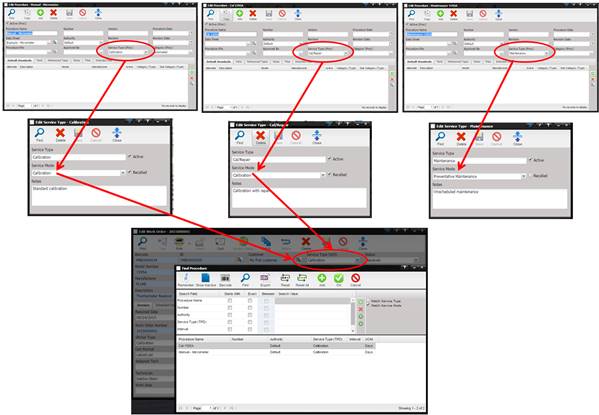
·
Match Service Type –
(default) – When checked, the find procedure results are filtered so that only
procedures that have a Service Type (Proc) value exactly match the Work Orders
Service Type (WO) value. (Service Mode values are not evaluated.)
If the Service Type (TPD) on the Cal1595A procedure is changed to Cal/Repair, it now longer shows up in the find with Match Service Type checked on the Find screen.
o The procedure can be viewed by selecting the Quick Link button.
· Data Sheet – Indicates the name of the file/record containing the data or test results for this service event.
o
To delete
‘points’ data, highlight the Data Sheet text field and press the Delete key on
your keyboard. A prompt is displayed asking you to confirm your action.
Pressing “Yes” causes the associated Points to be deleted.
o
All of the
actions behind this field are based on the Data Sheet Type associated with the Procedure
highlighted in the ‘Procedure Used’ field. The Data Sheet Type is derived by
first looking at the Procedure.
o
If the Procedure has a Category of “MET/CAL”,
the system assumes this procedure is used to manage MET/CAL related data
sheets.
o
If the Type Procedure Default has a Data Sheet
associated, that file is used.
o
If the Procedure has a Data Sheet associated
but the Type Procedure Default does
not have a file associated, the Procedure
file is used.
o
The types of
files that can be associated with the data sheets are either:
§ MET/CAL Procedure
§ Manual Template
§ File (Excel, PDF, etc.)
o If the Procedure Used is empty, the “…” button and the Quick Link button are disabled.
o If the Data Sheet is empty and the procedure associated with this work order is a File Procedure, selecting the “…” button causes the Select Data Sheet Action dialog to be displayed.
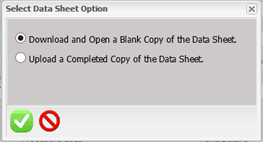
§ Download and Open a Blank Copy of the Data Sheet – This refers to the ‘Data Sheet’ configured for the currently selected ‘Procedure Used’. If this option is selected and the OK button is pressed, a copy of the ‘Data Sheet’ is downloaded to your computer.
§ Upload a Completed Copy of the Data Sheet – This option is used when you have mad local changes to the ‘Data Sheet’ file and want to attach your completed document to the respective Work Order. Selecting this option display an upload box which allow you to select a file from your hard drive. Select the OK button to complete the upload.
o If the Data Sheet is empty and the Procedure associated with this Work Order has the category of MET/CAL, selecting the “…” button causes MET/CAL to launch and the user proceeds through the process of performing a MET/CAL calibration. When the MET/CAL calibration is completed, the Data Sheet text box contains the word “METCAL - Results”.
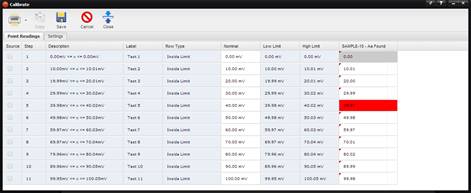
o If the Data Sheet is empty and the ‘Procedure Used’ is a Manual Template, selecting the “…” button displays the Manual Template ‘Calibrate’ page user, for entering data.
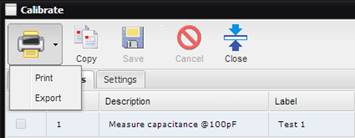
By selecting the arrow on the Print/Export button, this button can be used to print a Crystal Report that is a replicate of the Manual Template or to create a .CSV file that is a replicate of the Manual Template.
o
If the Data Sheet
is not empty, selecting the Quick Link button displays Data Sheet results.
§ If the ‘Procedure Used’ is MET/CAL, the MET/CAL Results Viewer page is displayed. All the
MET/CAL results associated with the Work Order are displayed.
§ If the ‘‘Procedure Used’ is a Manual Template, the ‘Calibrate’ screen is displayed and the
collected data can be viewed and modified
§ If the ‘Procedure Used’ is a File, a prompt is displayed, asking to download the attached ‘Data
Sheet’ file.
· Initial Condition-The condition the Asset was in when received.
This field can be changed on multiple
Work Orders when the Batch button is used. See the section Batch (Work Orders)
for more information.
· Reason for Service-The reason the Asset is in for service.
This field can be changed on multiple
Work Orders when the Batch button is used. See the section Batch (Work Orders)
for more information.
·
Temperature
– The atmospheric temperature at the time the service was performed. For MET/CAL users,
this field can be auto-populated using the Get Ambient button. This field
can be changed on multiple Work Orders when the Batch button is used. See the
section Batch (Work Orders) for more information.
· Humidity – The atmospheric humidity at the time the service was performed. For MET/CAL users, this field can be auto-populated using the Get Ambient button.
This field can be changed on multiple
Work Orders when the Batch button is used. See the section Batch (Work Orders)
for more information.
· Pressure – The barometric pressure at the time the service was performed.
This field can be changed on multiple
Work Orders when the Batch button is used. See the section Batch (Work Orders)
for more information.
· Interval – Indicates the interval of when the next service should be performed. The interval is combined with the Asset owner’s “Recall Rule” to calculate the due date.
This field can be changed on multiple Work Orders when the Batch button is used. See the section Batch (Work Orders) for more information.
· UOM – The unit of measure for the interval.
This field can be changed on multiple Work Orders when the Batch button is used. See the section Batch (Work Orders) for more information.
· On Site – Indicates the service was done or needs to be done on site.
This field can be changed on multiple Work Orders when the Batch button is used. See the section Batch (Work Orders) for more information.
· Expedite – Indicates the Asset needs to be expedited through the service process.
· Sub Contracted – Indicates this service should be subcontracted.
This field can be changed on multiple Work Orders when the Batch button is used. See the section Batch (Work Orders) for more information.
·
ISOCert
– Indicates the Asset requires an ISO or Accredited certificate.
This field can be changed on multiple
Work Orders when the Batch button is used. See the section Batch (Work Orders)
for more information.
· Cancelled – The Service Facility cancelled this Work Order.
o
When checked, the
Due Date can be left blank.
o
If MET/CAL
successfully completes a procedure, the Cancelled box is unchecked.
o
If a MET/CAL
procedure is terminated but the user does
not terminate the Post Prompt dialog, the Cancelled box is checked.
o
If a MET/CAL
procedure is terminated and the user does
terminates the Post Prompt dialog the WO is not updated and the Cancelled box
is not modified.
o
If there is no
Post Prompt dialog there is no ability to cancel completely before the WO is
updated. In this case, the Cancelled box is always checked when a procedure
terminates.
o
During Returning,
if checked, the Asset’s Scheduled Service information will not be modified.
Example:
The Service Facility does not have the capability to perform the service;
therefore is cancelling the Work Order and retuning the Asset to the Customer
as is, without action.
This field can be changed on multiple Work Orders when the Batch button is used. See the section Batch (Work Orders) for more information.
· Received OOT – Indicates that an Out of Tolerance condition exists with this Asset. If MET/TEAM data points are utilized, MET/TEAM automatically determines if an Out of Tolerance Condition Exists. Any Out of Tolerance condition causes MET/TEAM to automatically record the reading into the Out of Tolerance memo field and the Received OOT checkbox is selected. If other processes are used, the user can manually check this box.
This field can be changed on multiple Work Orders when the Batch button is used. See the section Batch (Work Orders) for more information.
· Return No Maint – Indicates the Asset owner has requested the Service Facility to close the Work Order and have the Asset returned with no maintenance being performed.
o
When checked, the
Due Date can be left blank.
o
During Returning,
if checked, the Asset’s Scheduled Service information will not modified.
Example:
The Owner has accidentally or unintentionally sent the asset in for service and
wishes it returned as is, without maintenance action being performed.
This field can be changed on multiple Work Orders when the Batch button is used. See the section Batch (Work Orders) for more information.
· Rejected – Indicates that as a result of this Work Order, the Asset has been rejected.
o
When checked, the
Due Date can be left blank.
Example: The Service Facility has performed
or attempted to perform the service and has found the Asset is damaged and is
beyond economical repair. The Service Facility marks the Rejected checkbox,
indicating the Asset is being “Rejected” as a result of this Work Order.
This field can be changed on multiple
Work Orders when the Batch button is used. See the section Batch (Work Orders)
for more information.
Note: If further data processing for the rejected Asset is
desired, using a data check in the returning page is recommended. (Data
Checks are not applicable for MET/TEAM Express.)
The Extended
Data tab displays the extended data elements for Work Order. The data in the
text fields on the right are brought forward from the receiving process.
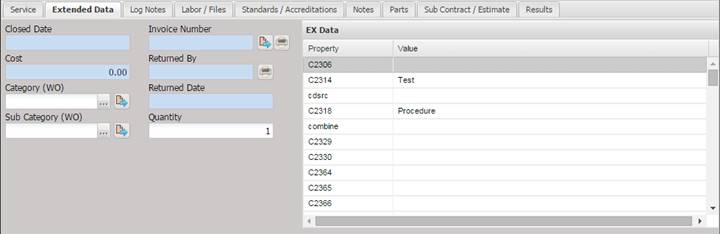
· Closed Date – The date the Work Order was closed. This date is controlled by the Workflow Returning process and cannot be edited by the user.
· Invoice Number –Displays the Invoice number this Work Order was billed on.
o The invoice can be viewed by selecting the Quick Link button.
o The invoice can be printed by selecting the Print button.
· Cost – The cost of the service. This cost is calculated by the Workflow Returning process.
· Returned By – Displays the name of the person who performed the Workflow Returning process. This date is filled in automatically by the returning process. Selecting the printer icon re-prints the shipping manifest for this Asset.
· Returned Date - Displays the date the Asset was returned to the customer. This date is controlled by the Workflow Returning process and cannot be edited by the user.
· Category (WO) –The category of the labor (not required). This field can be changed on multiple Work Orders when the Batch button is used. See the section Batch (Work Orders) for more information.
o The category can be changed by selecting the “…” button.
o The category can be viewed by selecting the Quick Link button.
· Sub Category (WO) – The subcategory of the labor (not required). This field can be changed on multiple Work Orders when the Batch button is used. See the section Batch (Work Orders) for more information.
o The sub category can be changed by selecting the “…” button.
o The sub category can be viewed by selecting the Quick Link button.
· Quantity – The quantity of items being serviced in the Work Order. Defaults to 1. If you are servicing sets, this quantity could be greater than 1. This quantity is used as the multiplier for the cost if there are no labor hours on the Labor/Files tab. This field can be changed on multiple Work Orders when the Batch button is used. See the section Batch (Work Orders) for more information.
·
EX Data -
The data in the grid can be modified by highlighting the element to be changed
and double clicking that element. Once the new value has entered, select the
Save button to save the changes.
The Log Notes tab displays all the activity logged against an Asset.

The log is read from top to bottom with the newest event being at the top. Most of the log events are entered in by the user. However, some events, such as “Out of Tolerance” are automatically entered in the log as well.
The Log Notes are updated on each Work Order when the
Batch button is used. See the section Batch (Work Orders) for more information.
To add a log
note, select the “+” button at the bottom
of the screen, select the status, complete the log event screen, then select
the Save button.
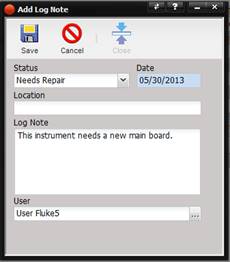
· Status – The status of the Work Order.
· Date – Date the log event was created. This date is controlled by MET/TEAM and cannot be edited.
· Location – The physical location of Asset.
· Log Note – General notes for this log event.
· User – Name of the technician creating the log event. The system defaults it to the currently logged on user.
o The user can be changed by selecting the “…” button.
To remove a log note, highlight the record to delete and select the “X” button at the bottom of the Log Notes tab.
To modify or view a log note, highlight or double click the log note and select the Quick Link button at the bottom of the Log Notes tab.
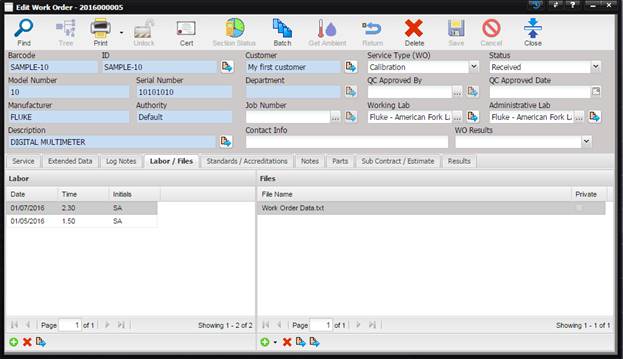
The Labor / Files tab is for recording labor expended on the Work Order (left side of the tab) and for attaching files related to the Work Order.

Labor and Files are entered by the user.
The Labor is updated on each Work Order when the Batch button is used. See the section Batch (Work Orders) for more information.
To add a labor record, select the “+” button at the bottom of the screen, complete the information on the Labor screen and select the Close button.
To remove a labor record, highlight the record to delete and select the “X” delete button at the bottom of the Labor/Files tab.
To modify or view a labor record, highlight or double click the labor record and select the Quick Link button at the bottom of the Labor/Files tab.
Labor records are also created by MET/CAL when a calibration is performed. Labor records created by MET/CAL use the calibration start date as the labor record start date, and the duration is the amount of time it took for the MET/CAL procedure to run. If the running time is greater than 24 hours, multiple labor records are created to reflect this. Labor records created by MET/CAL do not have the “No Charge” checkbox selected.
The Files half of the Labor / Files tab displays files related the Work Order. Files may be related either by Attach File (attaches an existing file) or by Upload File (uploading a new file). The buttons to the right of the grid can be used to add, delete, or view files.
Note: MET/TEAM can only upload
files that are 50mb or smaller.
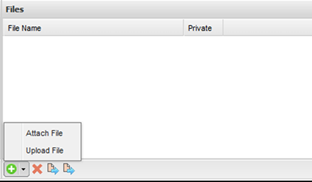
When the “+”button is selected, the user is presented with two options: Attach File or Upload File.
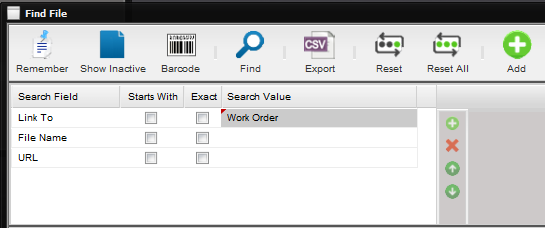
To attach an existing file to a Work Order, select the Attach File option. The Find screen is displayed for finding the File to add. Notice the ‘Link To’ search field contains the search value of “Work Order”. Press the Find button. The Files displayed are those files that were previously added using the Maintenance menu Files submenu and were categorized with a ‘Link To’ entry of “Work Order”. Select the file to attach from the results grid and press OK.
To attach a new file or URL to a Work Order, select the Upload File option. This option adds the File (as if the user had used the Maintenance menu Files submenu) and at the same time attaches the new File to the current Work Order.
The Add File screen is displayed. Notice the ‘Link To’ field contains the value of “Work Order”.
·
To upload a file,
leave the URL check box unchecked, check the Active check box, and press the
“Browse…” button.
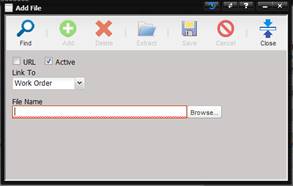
The Windows Choose File to Upload screen is displayed. Navigate to the file that is needed and select this file by double clicking. The File Name text box now contains the name of the file just selected. Select the Save button and the Add File screen closes. The file just uploaded is now displayed on the Work Orders Files tab.
·
To enter a URL,
check the URL checkbox check the Active check box, enter a filename in the File
Name text box, and enter a URL in the URL text box.
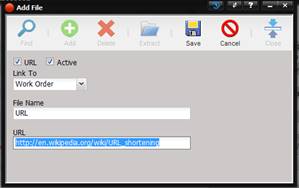
Select the Save button and the Add File screen closes. The URL File Name is now displayed on the Procedure Files tab.
To remove a File, highlight the record in the grid on the Files tab and select “X” button on the right of the Labor / Files tab.
To view the selected File, highlight the record in the grid on the Files tab and select the Quick Link button (the 3rd button) on the right side of the Files tab.
The Private column in the Files grid indicates whether a file is private (cannot be seen or accessed in Customer Portal) or public (can be seen and accessed in Customer Portal). To change the Private status of a file, right-click the file and choose Make Private or Make Public from the popup menu accordingly. Also, double-clicking an item toggles the Private status following a confirmation prompt.
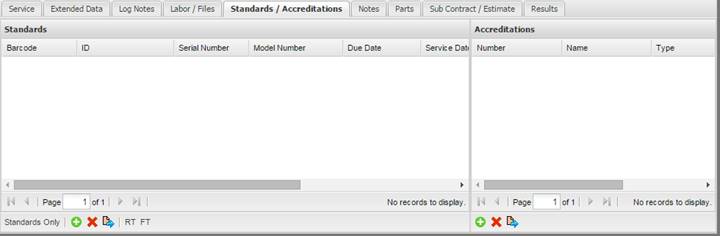
The Standards/ Accreditations tab is for
recording standards and accreditations associated with the Work Order. This Standards
and Accreditations are updated on each Work Order when the Batch button is
used. See the section Batch (Work Orders) for more information.
To add a standard or accreditation, select the “+” button at the bottom of the Standards / Accreditations tab. The Find File dialog is displayed for selecting the standard or accreditation.
·
The standards
displayed are only those that have been predefined for the selected procedure for
this type of service.
·
If a standard is
selected that is not currently in calibration, the user is warned that the
selected standard is out of calibration. However, it does not stop the
technician from selecting the standard.
· When adding a standard, MET/TEAM examines all associated Work Orders which have a service of Service Mode "Calibration". Once the most recent Work Order is found, the maintenance and due date from that record are recorded in the Standards grid. If, however, no suitable match is found, MET/TEAM examines the Asset Services associated with the selected Asset and uses the underlying maintenance and due date from there.
To remove a standard or accreditation, highlight the record and select the “X” button at the bottom of the Standards/Accreditations tab.
To modify or view a standard or accreditation, highlight or double click the standard or accreditation and select the Quick Link button at the bottom of the Standards /Accreditations tab.
The “RT” button at the bottom of the screen displays a reverse traceability report for the current Work Order. All Assets calibrated using this standard is displayed in a Crystal Report.
The “FT” button at the bottom of the screen displays a forward traceability report for the current Work Order. All Assets used to calibrate this Asset are displayed in a Crystal Report.
Note: Assets requiring no calibration must have a record in the Asset ‘Scheduled Services’ grid with an Service Type and Service Mode of ‘Calibration’, interval of ‘0’ and an Interval UOM of ‘None’, for that Asset to show up on the Traceability reports.
The Notes tab allows selecting predefined
blocks of text to be inserted for Accuracy, Uncertainty, Out of Tolerance, and
General Notes. To enter information, double click in the area or press ALT+Q.
For additional details on entering notes, refer to the Quick Notes section.
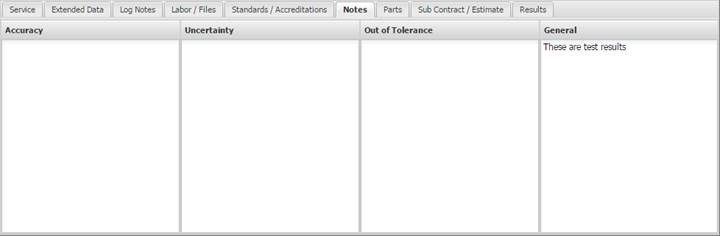
Accuracy Notes – Provides the technician with the ability to record the accuracy statement for this service event. By default, this information is displayed on the certificate of calibration. This field can be changed on multiple Work Orders when the Batch button is used. See the section Batch (Work Orders) for more information.
Uncertainty Notes – A place to enter uncertainty notes for the particular Work Order. If uncertainty notes were entered on the Asset screen, they are brought forward to here, but can be overwritten if necessary. This field can be changed on multiple Work Orders when the Batch button is used. See the section Batch (Work Orders) for more information.
Out of Tolerance Notes – Provides the technician with the ability to record out of tolerance conditions that may have existed during this service event. If a Data Sheet is used, MET/TEAM automatically records the out of tolerance information and stores the text of the event in this area. This information is used to produce an out of tolerance report to the customer. If an out of tolerance condition exists, this data must exist before an out of tolerance report prints. This field can be changed on multiple Work Orders when the Batch button is used. See the section Batch (Work Orders) for more information.
General Notes – Provides the technician with an area to record notes for this service event. This field can be changed on multiple Work Orders when the Batch button is used. See the section Batch (Work Orders) for more information.
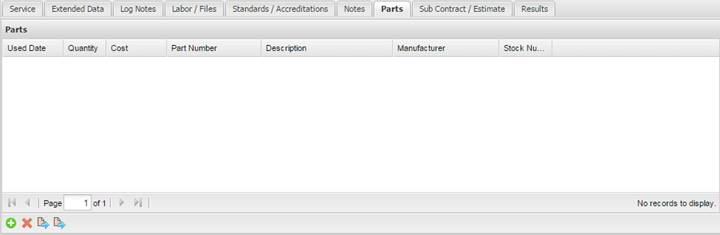
The Parts tab is for tracking parts used
during the service performed on this Work Order.
To
add a part, select the “+” button at the
bottom of the screen, complete the parts screen, and select Save button.

· Used Date – Date the part was used on this Asset.
· Quantity – Quantity of parts used.
· Job Number – The job number this labor is charged to (pre-filled with the Work Order job number)
o The job number can be changed by selecting the “…” button.
· Cost – Cost of each part.
· Part Information
o Part Number – Manufacturer’s part number.
o Description – Manufacturer’s description of the part.
o Manufacturer – Company who manufactured the part.
o Stock Number – Supply system ordering number.
To remove a Part and delete the Part Link, highlight the record to be deleted and select the “X” button at the bottom of the Parts tab.
The Part Link is the record that links the Part to the Work Order. To modify or view the selected Part Link, highlight or double click the part and select the 1st Quick Link button at the bottom of the Parts tab.
To modify or view the information pertaining to the Part itself, highlight or double click the part and select the 2nd Quick Link button at the bottom of the Parts tab.
The
Sub Contract / Estimate tab is for recording information related to sub
contracting this Work Order. In the event a maintenance facility does not have
the equipment, skill, or personnel to perform the needed service, the Work
Order can be subcontracted to an authorized subcontracting facility.
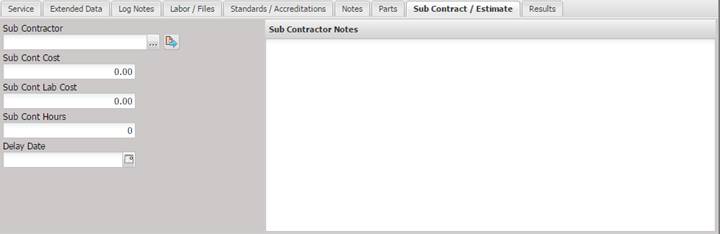
· Sub Contractor – The Facility assigned to perform the sub contracted service, only authorized Sub Contractors are displayed to the technician. This field can be changed on multiple Work Orders when the Batch button is used. See the section Batch (Work Orders) for more information.
o The sub contractor can be changed by selecting the “…” button.
o The sub contractor can be viewed by selecting the Quick Link button.
· Sub Cont Cost – The cost the lab passes on to the customer. Included in the cost of the Work Order, when applied to the invoice. This field can be changed on multiple Work Orders when the Batch button is used. See the section Batch (Work Orders) for more information.
·
Sub Cont Lab Cost – The cost to
the lab. For example, the lab may have sent an item to sub contractor and paid
$50 for the service, however they bill the customer $100 for processing
etc. In this example $50 in “Sub Cont Lab Cost”, $100 in “Sub Cont Cost”.
This field
can be changed on multiple Work Orders when the Batch button is used. See the
section Batch (Work Orders) for more information.
· Sub Cont Hours – The number of hours the sub contractor took to perform the service. This field can be changed on multiple Work Orders when the Batch button is used. See the section Batch (Work Orders) for more information.
· Delay Date – The date the item shipped to the sub contractor.
· Sub Contractor Notes – Notes sent to the sub contractor concerning the service. This field can be changed on multiple Work Orders when the Batch button is used. See the section Batch (Work Orders) for more information.
It is a best business practice to always open a Work Order even if you know ahead of time the Asset will be sent to a subcontractor. This way, you will have a historical record of the event.
The Results tab is used to display calibration data associated with the given Work Order. This data is saved in the database as results/points. This data is not saved as individual files. When a file (such as an Excel or .PDF file) is used as the Procedure, the results grid on the Results tab will be empty.
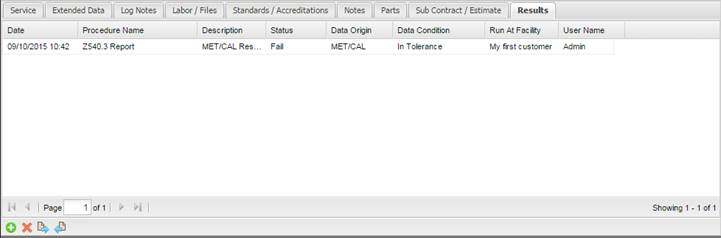
The fields in the grid show information regarding a calibration event:
·
Date – This is the date the calibration was first created.
·
Procedure Name – Name of
the MET/TEAM Procedure that was executed.
o
When a sectioned procedure is
executed, each section of the same procedure is displayed in their own row of
the Results grid.
·
Description – Description of the data
collected. The field varies with the procedure used to collect the data.
o MET/CAL Procedure
o Manual Template
o When using a MET/CAL Sectioned Procedure, the
Description field is the name of the procedure section.
·
Status – The overall pass/fail status of
the calibration event.
·
Data Origin – The origin of the data.
o MET/TEAM
o MET/CAL
o Other file types are not listed in the Results grid.
These files are attached as the Data Sheet on the Service tab or as an
independent file on the Files tab.
·
Data Condition – The As
Found, As Left, or Found Left data condition for a given calibration event.
·
Run At Facility – The Facility
where the data was collected.
·
User Name – The user who collected the
data.
Add or Delete Work Order Results, View Results, Edit Manual Calibration, and COMPASS Data File Import Buttons
To Add, Delete, View, or Edit Results or to do a COMPASS Data File Import use the buttons at the bottom left corner of the Results tab.
![]()
The “+” button either performs a calibration there are no results in the Results tab or opens the Find Procedure screen for selecting a Procedure associated with the Type of this Asset and then performs a calibration.
![]()
Note: The functionality of
this “+” button is driven by the System Default – “Work Order – Use Multiple
Procedures”.
The Find Procedure screen is displayed. The checkboxes Match Service Mode and Match Service Type on the Find Procedure screen behave as described in the Work Order Service tab.
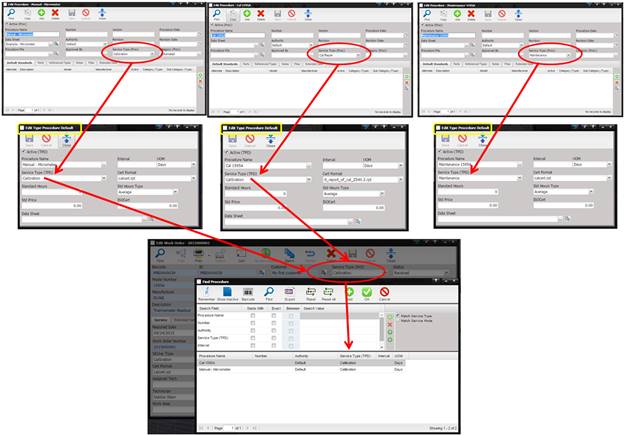
The “+”button functions based on the following logic.
·
Looks at the Type
Procedure Default associated with the Asset Type.
·
Checks if there
is an associated Data Sheet.
·
If there is no Data
Sheet, looks at the actual Procedure associated with the Asset Type.
·
Check if there is
an associated Data sheet.
·
If a Data sheet
is found, MET/TEAM looks at the method of calibration.
o If the Data sheet is a Manual Template, the Manual
Template Calibration screen is opened.
o If the Data sheet is a MET/CAL Procedure, MET/CAL is launched
and proceeds through the actual MET/CAL procedure.
o
If the Data sheet
is a regular file, a warning message is displayed informing the user of a
different workflow for managing that type of Data Sheet.
To remove a selected row of calibration data, highlight the row and select the “X” button.
![]()
A prompt is displayed.
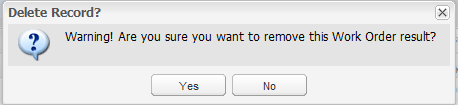
If Yes is selected, MET/TEAM removes the calibration data from the Work Order.
To delete a point from the Work Order results, double click the work order result on the Results tab. On the data viewer screen that is presented, highlight the point to delete and press the Delete button the toolbar.
Note: The pass/fail
determination for the work order result the point belonged to is not re-run at
the time of deleting a point.
Data points collected during a calibration event (manual or MET/CAL) can be viewed by highlighting the row and selecting the Quick Link button with the blue arrow pointing to the right. If the highlighted row references a File, the user must use the Data Sheet field Quick Link button on the Service tab to view the collected data.
![]()
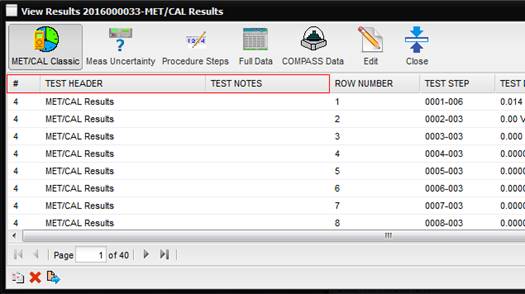
The View Results
screen is displayed.
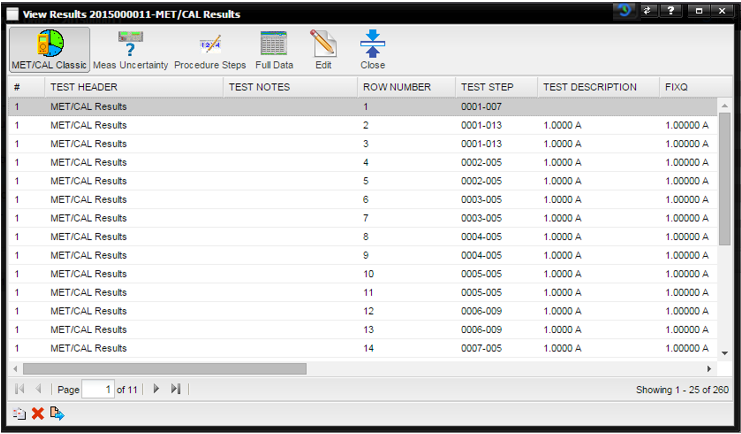
The data can be viewed in different ways by using the MET/CAL Classic, Meas Uncertainty, Procedure Steps, and Full Data buttons in the tool bar. You can Edit, Copy, or Delete individual points.
When viewing using the MET/CAL Classic, the Meas Uncertainty, or the and Procedure Steps button, the #, TEST HEADER, and TEST NOTES belong to the parent record (Work Order Result). Editing any one of these, changes the value for the entire column (i.e. Work Order Results record).
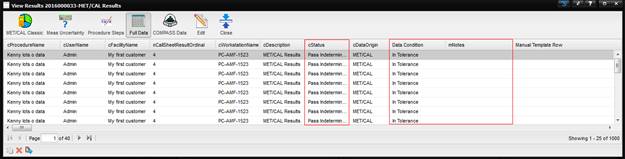
When viewing using the Full Data button, the cProcedureName, cUserName, cFacilityName, nCallSheetResultsOrdinal, cWorkstationName, cDescription, cStatus, cDataOrigin, and Data Condition belong to the parent record (Work Order Result). Only cStatus and Data Condition are editable. Editing either of these fields, changes that value for the entire column (i.e. Work Order Results record).
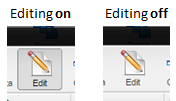
Select the Edit button from the toolbar to edit a point. This button is a toggle button and appears pressed when editing is on and not pressed when editing is off.
To edit individual readings for points shown in the View Results grid, double click the row. The View Point Readings screen is displayed.
Note: When viewing
Manual Template data, the Enter Text data is presented in the Test Status
column which allows this data to be presented on a report.
Note: The Edit button is
only displayed if the System Default – “Work Order – Edit Calibration Points”
is active and the Work Order is not locked.
When using MET/TEAM Mobile, the Edit button is disabled if
the Work Order was created prior to Mobile Check-out.
When editing is on, you can click into a cell on the grid and update a value. Pressing enter updates the data in the database for that one field that was edited.
The buttons in the lower left corner of the View Results screen provide for copying, deleting and viewing point readings related to the results.
Note: When using MET/TEAM Mobile, Work Orders that were created prior to Mobile Check-out cannot be deleted and Results cannot be copied, edited, or deleted.
![]()
·
Copy button - Selecting the Copy button at
the bottom of the grid creates a duplicate of the selected row and inserts this
duplicate right underneath the selected row.
![]()
·
Delete button - Selecting the Delete button at
the bottom of the grid deletes the selected row, after a confirmation prompt is
affirmed.
![]()
·
View Point Readings button - Selecting the
View Point Readings button at the bottom of the grid or clicking any row on the
View Results screen opens the View Point Readings screen.
![]()
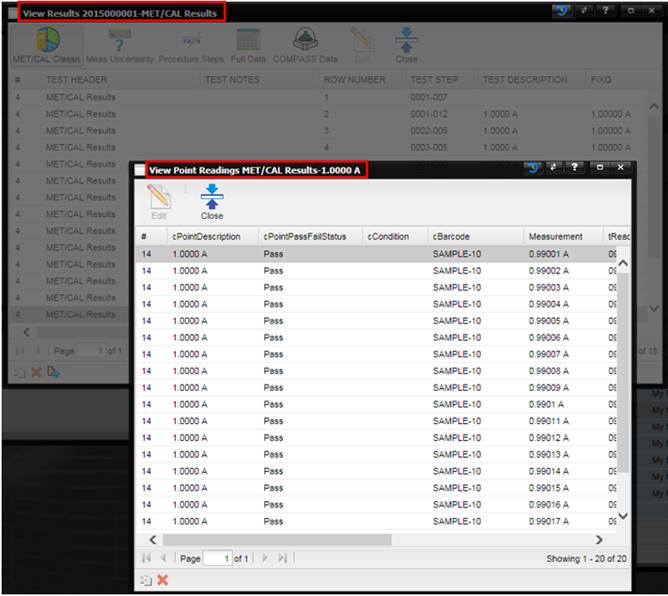
This View Point Readings screen is displays the individual readings associated with the point highlighted on the View Results screen. You can Edit, Copy, or Delete individual readings. The Measurement and cReadingUnit are editable. All other fields are not editable. The first three columns, cPointDescription, cPointPassFailStatus, and cCondition, belong to the parent record (Point, highlighted record from the View Results screen). These columns are displayed for ease of reference. The View Results screen is not accessible to prevent selection of another result while the View Points Readings screen is displayed.
To edit individual readings shown in the View Point Readings screen, select the Edit button in the toolbar.
Note: The Edit button is
only displayed if the System Default – “Work Order – Edit Calibration Points”
is active and the Work Order is not locked.
When using MET/TEAM
Mobile, the Edit button is disabled if the Work Order was created prior to Mobile
Check-out.
This button is a toggle button and appears pressed when editing is on and not pressed when editing is off.
When editing is on, you can click into a cell on the grid and update a value. Pressing enter updates the data in the database for that one field that was edited.
The buttons in the lower left corner of the View Point Readings screen provide for copying and deleting individual point readings related to the results.
Note: When using MET/TEAM
Mobile, Work Orders that were created prior to Mobile Check-out cannot be deleted
and Results cannot be copied, edited, or deleted.
![]()
·
Copy button - Selecting the Copy button at
the bottom of the grid creates a duplicate of the selected row and inserts this
duplicate right underneath the selected row.
![]()
·
Delete button - Selecting the Delete button at
the bottom of the grid deletes the selected row, after a confirmation prompt is
affirmed.
![]()
Data points collected during a manual calibration can be edited by highlighting the row and then selecting the Quick Link button with the blue arrow pointing to the left. This button is only if a Manual Template was used to collect the data.
![]()
Note: This
button is not enable if the data is from a MET/CAL procedure.
Data from COMPASS can be imported via the this button.
For complete details see the section COMPASS Data File Import.
Note: The button is only
visible when the System Default – “Work Order – Enable COMPASS Data File
Import” is active.