An understanding of Data Checks and SQL script is recommended when using this functionality. An advanced Data Check is used to manage the Scheduled Alert setup for the “Recall-Alerting-ToolAssignment.rpt”.
Note: The SQL script
creates a Data Check called “Runnable - Manage Recall”.
The Data Check must be configured for a single Recall report. If there is a need to use this Data Check on more than one Recall report, a separate Data Check must be created. The SQL script can be customized by following these instructions.
·
Log in to
MET/TEAM as an Administrator.
·
Go to Configure menu
Data Checks submenu.
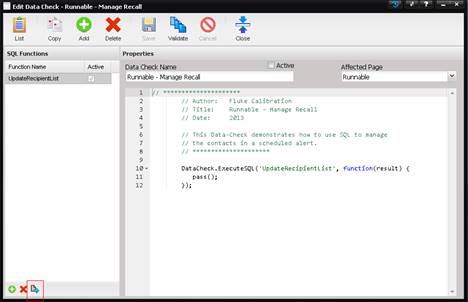
·
Select the Data Check
“Runnable – Manage Recall”.
·
Select the Quick
Link button underneath the “SQL Functions” list (at the bottom of the page).
This will allow us to configure the SQL script.
·
The Edit Data
Check SQL screen is displayed. Look for the line highlighted in the following
screenshot and change the value to exactly match your Recall Alert name. (If
you followed the earlier portion, this value should be ‘Recall Alert’).
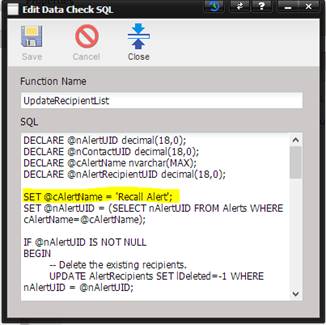
Once the necessary changes have been made, select the Save button. Close the Data Check.
Once the Data Check has been configured, it must be associated with the Scheduled Alert.
·
Go to Reports
menu Alerting Schedules submenu.
·
Find the Scheduled
Alert.
·
Select the
ellipsis button next to the Data Check field on the Scheduled Alert screen.
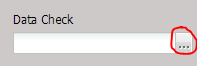
·
The Manage Data Check
Scripts screen is displayed. Select the item titled “Runnable – Manage Recall”.
·
Double-click the
Data Check “Runnable – Manage Recall”. The Data Check is now displayed on the
Scheduled Alert screen.
·
Save the Scheduled
Alert.
Everything is now configured and Scheduled Alert will fill in the Contacts when run.