Often we would like to present data slightly different than it is stored in the database. For example, we would like to see our report changed slightly to gather data on the average amount of time each instrument of a given type takes to go through the calibration process and how much time each technician spends working on a given instrument type. This will give valuable information about the efficiency of our calibration lab and the training of our techs. We can do this in MET/CAL by using Crystal Reports Formula fields.
To do this report, we will use the report we just created, rename it by saving it as TURN.RPT. Our report will need the following information not on the report we just created:
·
Work order open
date
·
Work order
maintenance date
·
Technician who
did the calibration
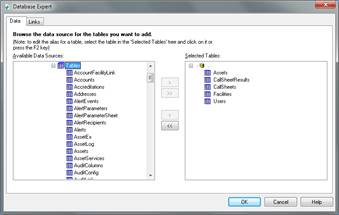
In order to do so, we need to add the work order table to the report, which is called CallSheets, as well as the CallSheetResults table, which contains the information about the technician. Since one CallSheets record can have more than one CallSheetResults record, we may get more than one technician returned, for who performed this calibration. The technician reference reflects the user that was logged into MET/CAL at the time of calibration. To get the user information, we will also need to add the Users table.
While we’re adding these new tables we can get rid of tables we no longer need at the same time and remove AssetServices, ToolAssignments and Contacts from the tables on this report.
Let’s go back to the Database Expert and swap out the tables:
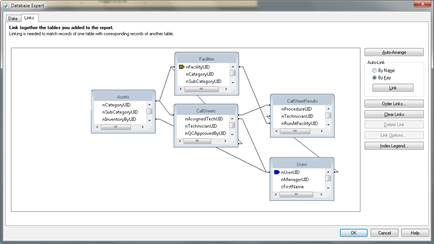
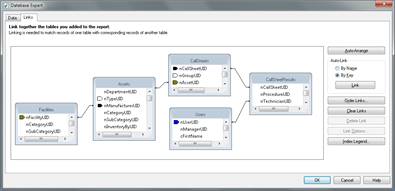
Now we need to do some cleanup of the automatic table linking performed by Smart Linking. Switch to the Links tab and delete all links to the Users table. Then add one link from CallSheetResults.nTechnicianUID to Users.nUserUID. Likewise with Facilities, the only link we want is from Assets.nManufacturerUID to Facilities.nFacilityUID, as we had it set up prior to adding the new tables.
The final result should look like this:
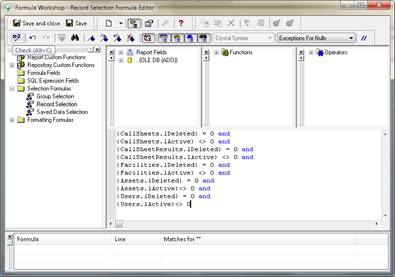
Now let’s go back to the Formula Workshop, remove the fields of the tables that are no longer on the report and add the filters for lActive and lDeleted for the tables added. The final result should look like this:
Now remove the fields for the due date and the composite field for the contact and change the report heading to “Turnaround Time Report”.
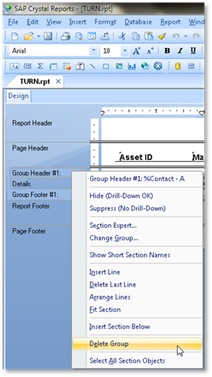
Now right-click on Group Header #1 and select Delete Group.
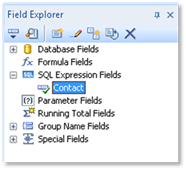
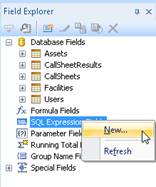
On the Field Explorer on the right hand side of the report designer window, select the Contact SQL Expression Field and press the Delete key to remove it.
We will also need to develop a formula to calculate the amount of time spent in the lab. This assumes the open date is the date received into the lab and the maintenance date is the date it was shipped back to the user.
We now need to add these new data fields to the report:
·
CallSheets.tMaintDate
·
CallSheets.tOpenDate
·
Users.cFirstName
·
Users.cLastName
Since we removed one column and are now adding four, it will be best to change the report layout to landscape, in order to fit the data neatly.
Now add the new columns from the Field Explorer on the right hand side, Users.cFirstName, with a heading of “First”, Users.cLastName with a heading of “Last”, CallSheets.tOpenDate with a heading of “Arrive” and CallSheets.tMaintDate with a heading of “Ship”.
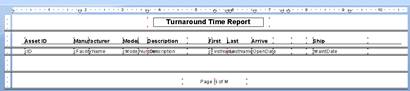
Like we did before, we need to change the headings from their default database column names and format them, so they are bold, 11 size and in the right place, aligning with the existing columns. Adjusting the columns is best done in preview mode, where changes are apparent immediately.
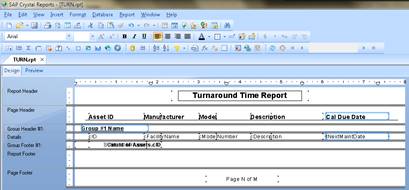
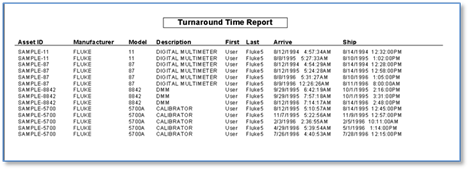
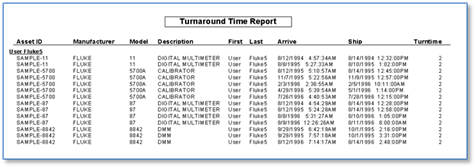
Our report should look like this:
We now have almost everything necessary to run this report except a way to do the necessary calculations. We will do this with a formula placed in the details section of our report.
To Insert a Formula Field:
·
Click the Formula Workshop button
·
Right-click
Formula Fields in Field Explorer on the right hand side of the designer and
select New…
Name it “Turntime” and in the Formula Editor, type an opening curly brace which will start the guidance via popups, first offering a list of tables to select from. Select CallSheets and press enter. Now a new list will pop up with the fields for the selected table. Select tMaintDate and press enter. Then enter a minus sign and another opening curly brace. Repeat the process for CallSheets.tOpenDate and press enter.
What we have now entered is a formula to subtract the open date from the maintenance date. To check if the formula entered is valid, press the x-2 button on the toolbar.
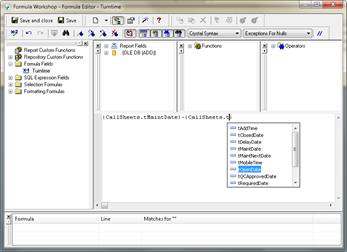
When the formula is valid, a message “No Errors Found” will pop up. At this time, press the Save and close button. Then add the newly created formula field Turntime to the report. Right-click the new field, select Format Field… and change the number format so that we won’t get fractional days.
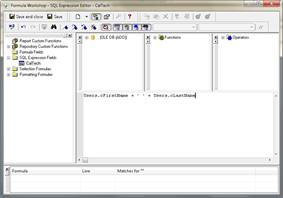
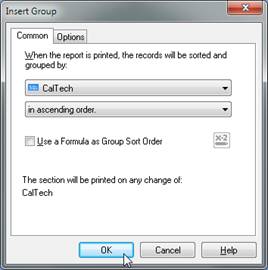
Now we can re-establish a record grouping, this time based on the cal tech. Again, first we’ll create a composite column made up of Users.cFirstName + ‘ ‘ + Users.cLastName and name it CalTech.
Then select Group… from the Insert menu and find the new CalTech column in the dropdown on the Insert Group dialog.
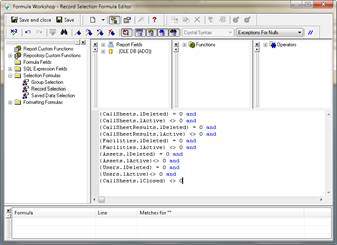
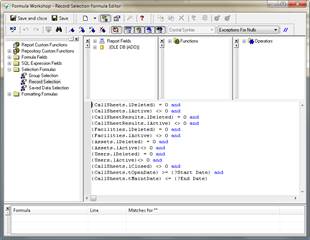
We want to make sure we’re not looking at open work orders for this report, since they are still being worked on. For that, we’ll only include records where CallSheets.lClosed <> 0 (i.e. true).
Go to the Record Selection Formula Editor by selecting Report, Selection Formulas, Records and add the condition.
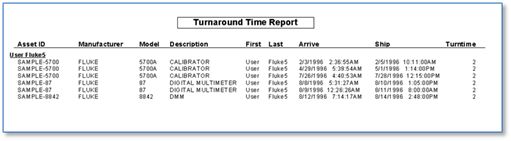
Now our report looks like this:
To wrap up the turnaround time report, let’s add some parameters, so that it will prompt for start and end dates of the time frame to be captured. In Field Explorer, right-click Parameter Fields and select New…
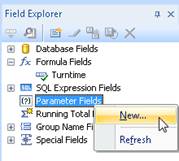
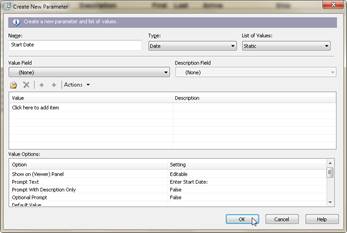
Name the new parameter Start Date, select a type of Date and Static for the list of values. Then repeat the process for the second parameter, called End Date.
Note: Although, the
Crystal Report Designer allows for symbols (i.e. +,*,$,#, etc) in parameter
names, symbols should not be used in parameter names when writing reports for
use in MET/TEAM.
To tie into the new parameters, select Selection Formulas, Record from the Report menu and add these two lines:
and {CallSheets.tOpenDate} >= {?Start Date}
and {CallSheets.tMaintDate} <= {?End Date}
When refreshing the report via F5, we get a prompt for start and end date of the reporting period.
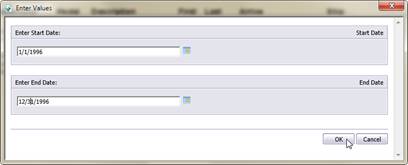
Now, the report data is limited to the one year time frame entered in the prompts.