The Run Import screen allows for processing the data to be imported. Once the Run Import menu item is selected, the system verifies that the required system defaults needed by the Import are configured correctly. If not, messages are displayed.
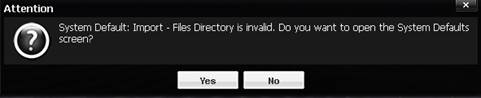
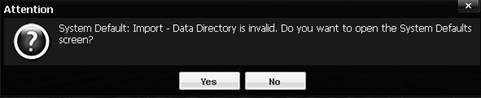
If Yes is selected, the System Defaults Edit screen is displayed, allowing for the settings to be changed. The directories are for temporary storage and refer to a local path on the server, e.g.: c:\import\data.
If the settings are set properly, the Find screen is displayed. Select the Cancel button create a new import. Before performing an import, open the data file in a text editor and note if there are column headings in the first row(s) of the file, to be skipped over when the data is processed.
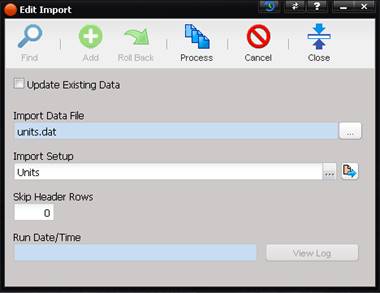
· Update Existing Data – Determines whether this import will perform an update on or skip over existing records.
· Import Data File – The data file to import.
o The Import Data File can be changed by selecting the “…” button.
·
Import
Setup – The import setup to be used.
o The Import Setup can be changed by selecting the “…” button.
o The Import Setup can be viewed by selecting the Quick Link button.
· Skip Header Rows – The number of header rows at the top of the Import Data File.
· Run Date/Time – The date the import was processed. This field is automatically populated.
· View Log – This button is enabled when opening a processed Import for review and allows for downloading the log information as a text file.
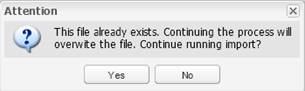
Select the Process button to initiate the import. If a file with the same name exists in the temporary location, a confirmation warning is displayed.
When the import is running, progress is
displayed on the screen. 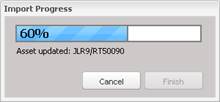
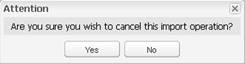
To abort the import, press the Cancel button on the Import Progress screen. A confirmation prompt is displayed.
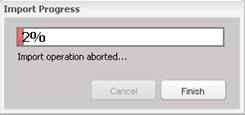
The Import Progress displays the progress bar showing that the import operation was aborted.
When the import is finished, a confirmation message is displayed.
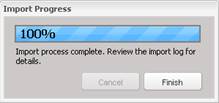
Upon selecting the Finish button, the Run Date/Time is filled in and the View Log button is enabled.
Rejected records are added to a redo file with the same name as the source, but an extension of “.redo000.txt”. For example, a data file called “test.src” creates a redo file called “test.redo000.txt”. Subsequent processing of the same Import Data File creates redo files with an increased number in the redo extension, up to 999 (i.e.; “.redo000.txt”,” .redo001.txt” … “.redo999.txt”).
Select the View Log button to display the log that was created for the import. This log shows any problems that occurred during the import.