
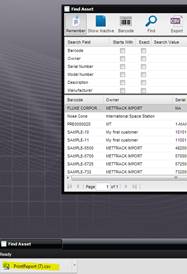
Remember – When depressed, the user’s last search field criteria are remembered and the search fields are configurable.
Note: If the Remember button
is not selected, vertical buttons on the right of the Search are not enabled.
These buttons are: add, delete, move up, and move down for the Search Fields.
Show Inactive – By default, Find dialogs show only active records within MET/TEAM. If data has been referenced within MET/TEAM but is no longer used, it may be marked as inactive. In order for the user to view or select inactive data, the Show Inactive button must be depressed. Once the user has entered the search criteria and selected Find, the results are displayed for both active and inactive records. To hide the inactive records, toggle the Show Inactive button again and select the Find button to refresh the screen. One exception to this rule is in the Work Order screen. By depressing the inactive button, the Find dialog includes closed (history) Work Orders.
Barcode – Selecting this button places the Find dialog in Barcode mode. The user can then use a scanner or other reading device to enter data into the find process. If the Find dialog returns only one record meeting the Search Criteria, the find automatically processes the results and takes the user to the selected data.
Find – Starts the find process. After the user enters the search criteria, the Find button is selected to start the search (pressing the “Enter” key also starts the search).
Export – Creates a .CSV file containing the search contents and presents it to the user to open. For optimal compatibility, a tab character is used as the delimiter in the .CSV file.
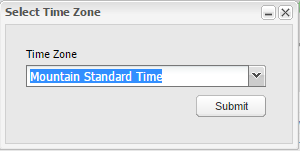
When exporting data to a .CSV file, the Select Time Zone prompt is displayed. The drop-down lists all time zones with the same UTC offset as your current time zone. This is used to facilitate converting any exported dates to local time, including adjusting for Daylight Saving time, as applicable. Select the appropriate time zone to use for the export and click Submit to initiate the export process.
The file download is shown at the bottom of the browser.
Reset – Clears the current search criteria, allowing the user to enter new search criteria.
Reset All – Resets the search criteria and search fields to the default configuration. The user is presented with a prompt.
·
If “Yes” is
selected, the Search Value fields and Starts With, and Exact checkboxes are set
back to the original defaults.
·
If No is
selected, the Search Field column is blanked allowing the user to fill in the
fields; customize the search criteria.
·
If “Cancel” is
selected, no action is taken.
Add – Opens the corresponding screen for creating a new entity. For example, if the Find Assets screen is open and the Add button is selected, the New Asset screen is displayed for adding a new asset. The Add button is disabled when adding a new entity is not available.
OK – Uses the selected record(s) and processes the data. When in single select mode, this can also be accomplished by double clicking the desired record.
Cancel – Cancels the find process and exits.