The Bulk Change button on the Asset screen allows updating multiple Assets at one time.
1.
Find the Asset
that will be the Master Asset using the Asset screen Find button. This is an Asset
that has the desired data configured to update other Assets.
2.
Select the Bulk
Change button on the Asset screen
3.
The Find screen
is opened in “multi-select” mode. Select all Assets that you want to change to
match the Master.
4.
Select the Ok
button.
5.
The Bulk Change
screen is displayed with the Assets from the Find screen listed in the grid. The
Master Asset is identified above the grid of
Assets.
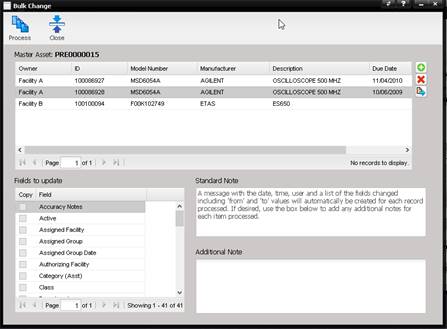
a.
Use the “+”
button on the right side to add additional Assets to the list.
b.
Use the “X”
button on the right side to remove Assets from the list.
c.
The Quick Link
button on the right side can be used to view additional information for a
highlighted Asset.
6.
In the Fields to
Update grid, on the bottom left of the screen, select the label of the fields
you want updated. The Copy checkbox will be checked.
7.
Repeat step 6 for
all fields you want to copy from the Master Asset to the other Assets.
8.
The Standard Note
explains that a note is automatically added to the Assets that are being
changed with the date, time, user, and a list of the fields changed including
the “from” and “to” values when the Bulk Change is processed.
9.
Add any
additional information in the Additional Note field. This information is also
added to the Notes field of the Asset. The Asset Notes can be viewed on the
Asset History/Notes tab.
10.
Select the
Process button.
All items in the grid will be updated as designated on this screen.