This section explains our recommended process for doing Sub Contracting using the MET/TEAM application.
Note: The process described below assumes these Work Order statuses
have been added by the System Administrator:
“Send to Sub Contractor”
“Sent to Sub Contractor”
“Returned from Sub Contractor”
1.
On the Type that
is associated with the Asset that is being sub contracted, create a Procedure
(for example: “Sub Contractor – Fluke”, “Sub Contractor – Agilent”).
2.
Create a Work
Order by selecting the Workflow menu Receiving sub menu.
3.
From the
Receiving screen complete the receiving details and all information pertaining
to this asset. Select the status “Send to Sub Contractor” and then the Process
button and the asset will be processed.
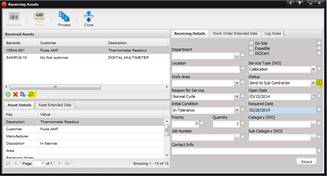
4.
After the Process
button is selected, the Edit Work Order
button is enabled. (Notice the yellow highlighted button in the screen shot
above.) Select the Edit Work Order button and the Work Order is opened.
5.
The Work Order is
opened.
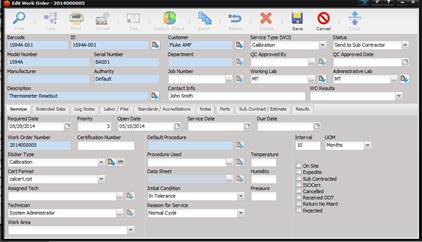
6.
Check the Sub
Contractor check box.
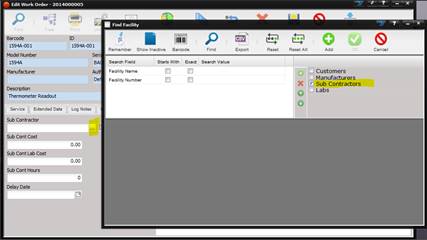
7.
Select the Sub
Contractor /Estimate tab and the Facility that is the Sub Contractor. The Sub
Contractor is selected by pressing the “…” button next to the Sub Contractor
field. This Facility must be setup ahead of time. The Find Facility screen is displayed.
If the Sub Contractor check box is not selected, select this check box so you
are choosing only from the Facilities that have been designated as approved Sub
Contractors.
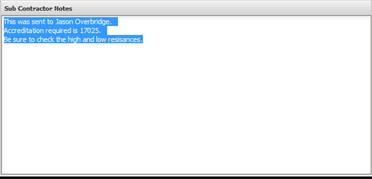
8.
Enter any notes
in the Notes field. Notes may include; who the asset was sent to, how the asset
was sent (UPS, FedEx), the shipment number or tracking number, any notes
related to the process, type of accreditation, possibly expected return date,
quote back or fixed price.
9.
Enter the date
you expect to receive the instrument back or enter the date the instrument was
sent to the Sub Contracting Facility in the Delay Date field
10. If known, enter the price that you are charging the
customer in the Sub Cont Cost field.
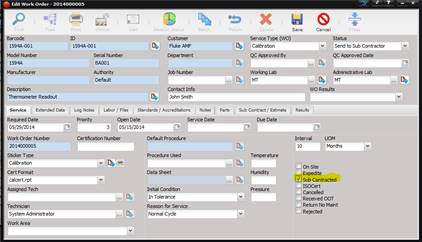
11. Using the Log Notes tab, add a Log Note and change the
status to “Sent to Sub Contractor”.
12. Save the Work Order.
13. Wait for the return of the asset from the Sub
Contractor and update the Notes field on the Sub Contractor / Estimate tab as
necessary.
14. When Asset is returned from the Sub Contractor, open
the Work Order and add a Log Note changing the Status to “Returned from Sub
Contractor”.
15. Select the Sub Contractor tab and complete the
information:
a. Sub Cont Cost –
the amount the lab is charging the customer
b. Sub Cont Lab Cost – the amount the lab paid Sub
Contractor
c. Sub Cont Hours – if you will be tracking internally
the hours related to this Sub Contracting event enter them here
16. Select the Service tab.
a. Select the Procedure Used if necessary.
b. The Data Sheet will typically be blank.
c. Attach the Report returned from Sub Contractor using
the Labor/Files tab. This file should be not marked “Private”. Therefore, in
Customer Portal, the Customer will be able to view and print the certificate.
d. If the customer has been invoiced, use the Labor/Files
tab and attach the Invoice marking this file as private. This invoice is from
the Sub Contractor stating the amount due for the work they performed.
e. Continue filling in the all information on the Service
tab making sure to complete the Service Date and Due Date.
f.
If you are
outsourcing your own equipment, the Sub Cont Lab Cost may not be applicable.
17. Follow your standard metrology practices filling in
the data on the remaining tabs. The Notes field on the Notes tab can be
utilized for ISO accredited or anything specific to this Asset.
18. Save the Work Order.
19. When you are ready to Return the asset, enter a Log
Note changing the Status to Complete.
20. Use the Return button to return the Asset which is now
ready for Shipping.
21.
If not already
invoiced, follow normal business process to Invoice the customer.